Showing posts with label staging on a budget. Show all posts

Saturday, July 19, 2014

Backyard Staging

Backyard Staging

First things, first: the cleaning. Chances are if a house has been vacant for a while, things in the backyard landscaping probably need some TLC.  Trim the hedges, make sure it's getting mowed regularly, and of course clean out any grass or weeds in the flower beds.  Some properties may have been REALLY neglected, but in my experience, CLEANING was all it needed.

Example: the backyard where my daughter was renting was horrendous. But it was so big, it was too overwhelming for her to do anything about it. That's where I stepped in. Out of all the work we did to that back yard, 80% of it was cleaning.

Here's a before pic of the concrete patio in the very back of the yard. Totally unusable:
Not sure if you can tell from this photo but there were two giant rolls of metal fencing material on the concrete, along with several inches of dirt and weeds covering most of the patio.  I had the fencing hauled off (Freecycle! So it was put to good use) and took a weed eater to the concrete to get all the dirt and weeds off the surface. After it was edged, I cleaned it off with the garden hose sprayer.

I had two outdoor chairs and an outdoor table (Freecycle again!) and this was the end result:
Price of this project: $0.00!
Now if I owned this house, this would be the perfect spot for a Pergola! I would repair and do a decorative concrete treatment, stone edging and more landscaping. String white lights and maybe even add a fire pit, wouldn't that be cool?

Here is another perfect example of a patio just teeming with potential. First: cleaning. Always. Suggested staging ideas:
  • planters on each side of the back door
  • a 5'x7' indoor/outdoor rug ($35-$200 depending on where you shop)
  • ask if you can paint the door (optional, but would add so much)
  • a small bistro table set (Freecycle, thrift store, or buy new.)
Here's an idea for the painted door. It even looks cute from the inside!

This wicker outdoor bistro set sells at www.target.com for $170:
And here's a cute idea for the 2 planters. If you know someone handy with building boxes, this could totally be a DIY project:

Expenses

Now you might be cringing at the thought of buying things for your staging needs. Keep in mind, these things belong to you and will be returned to you after the sale. You can use these things over and over, house to house and they will more than pay for themselves. 

Tip:  When not being used for staging, bring this stuff home with you. If it's furniture, use it! If it's containers of plants, decorate your own porch or interior of your house.  I have been known to take things out of my own home to stage a property!  As long as it's in good shape, make use of it. Just remind the agent to mention to potential buyers that the furniture and landscaping containers don't come with the house. Anything you put in the ground stays, obviously. ;)


Next: Windows


Friday, July 18, 2014

Porches

No, unfortunately we are not talking about Porsches. Although this one would look smashing in my driveway.


Porches

Yes, Porches. The front and sometimes back areas of homes just outside the door. It's what sits between the doorway and the yard, and they come in all shapes, sizes and styles. In this post I wanted to showcase some spectacular porches which would be something to aspire to once you buy your property, or if you own already.  Secondly, I want to show porches with potential, so that when you are looking at properties you can picture all the wonderful things that can be done to front and back porch areas. I will also include staging ideas, of course, since that is the point of all this. ;)

Front Porches

Large front porches are more commonly found with older, southern style houses. Wrap around porches are truly a valuable commodity if you can find them. Here are some photos of some nicely outfitted front porches:

This porch is plain concrete and not very big, but the owners have made the most of it by adding lantern lighting and gorgeous planters on either side of that beautiful wood door. This is what I call making the most of what you've got. Picture this without the lighting, planters and with an ugly white metal door. Terrible, but that may be how they found it, and look what a difference a little style can make! 
Next up is a larger, covered porch where the residents probably do a lot of sitting and visiting. I know I would if my front porch was this lovely! Notice the homey feel that those two indoor/outdoor rugs give the space. Really I think the rugs are the key to what makes this porch fabulous; otherwise it's just a couple of black metal chairs, really. See what a decorator's touch can do? Hmm? I think you do.

Tip: Great resources for indoor/outdoor rugs are Target.com, Home Depot, Lowe's and BallardDesigns.com just to name a few. The rugs' popularity is growing, and you can see why. Gone are the days of ugly mats outside. Now you can have a Persian rug outdoors if you like!


Now here is a LOVELY space that is stunning, but in reality very very simple. Besides the covered front porch, there are only two elements, the swing and a planter, yet it is breathtaking! Who would not want to curl up on that swing with some tea and a good book and just sit for hours?

Now this is one is almost too perfect, but it was on Pinterest so it has to be real, right? This porch was obviously made for entertaining. Who wouldn't want to have a party out here? I can't see the rest of the house but I can almost guarantee it is a stately Southern mansion. I just love the dark finish on the wooden slats of the porch base. This has obviously been very well taken care of. It would be beautiful even without all that furniture on it; just that floor and those planters are enough.

Back Porches and Pergolas

Back porches are typically not as stately as the front porch, because fewer people see it. But making the most of your back porch really adds to the character and welcoming factor of your back yard space. Here is one I just love, and in fact plan on doing something very similar to this to my own house, just without the fire pit. We don't need anything any more flammable than the grill that close to the house:

Here is a creative way to make the most out of a small, otherwise unused space on a back porch:
I can see my daughter, Alex planted right there with a book or her computer for hours!

Porch Floors

I don't know if "porch floors" sounds right, but you all know what I mean, right? The deck part. Or concrete. Or exposed aggregate. Whatever your feet are touching when you walk out there!

Painted Wood

Here someone got super creative and painted their own rug right onto the planks of their porch and I LOVE IT! I have a feeling this will only look better with age, too which is always a good quality to have in a decorative element:

Concrete

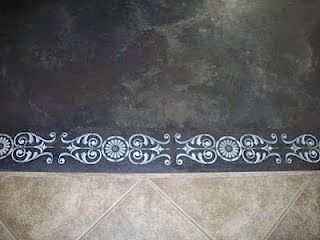
There are many ways to treat concrete, from simply painting it with exterior paint to really getting artistic with it.  Here are a few examples of each:

I love this one! And so easy to do. You mark off the design with painter's tape and do one color at a time. So charming!
Here is the same design on a larger scale: {LOVE THIS}


Here is a very simple but pretty painted border on a concrete porch:
The thing about concrete is that it's everywhere, and usually ugly. But that means it has *Potential!* And with the right set of instructions (do your research!) you can do this yourself.


When staging a house, of course you need the home owner's permission and probably funds to do something like this, but if it's something simple and you present it right, it really can add value to the property if done correctly.


Remember, aaaanything is better than this:
Next: Backyard Staging

Wednesday, July 16, 2014

Tips for Landscaping on a Budget

Money Doesn't Grow on Trees... Or does it?

I've talked a lot about how important it is to have great curb appeal, and that empty flower beds are sooo ugly and depressing. The solution is to put something in those beds, but that costs money. And we're just in the staging process, the house hasn't even been seen much less been sold yet! So I have a few tricks up my sleeve to help with that expense that would otherwise be out of your pocket.

Propagation

To propagate a plant means to grow one from another one. Some plants are propagated very easily; others take professional horticulturists and since I'm assuming there are few horticulturists in my audience, I'll just stick to the easy ones. :)

If you have a flower bed at home that you can sacrifice for this, or a sunny window sill in your garage, you can propagate a variety of plants yourself for your staging projects. It takes a little space where you can work with potting soil and fertilizer, so if you don't have a work bench in the garage or a garden shed, then just do it on the back porch.

Suggested Starter Plants

One of my favorite kind of plant is the succulents. They come in a variety of shapes and colors, and look great in potted arrangements in window boxes, pots on the porch, and also in the ground. Here is an arrangement I have and love:


Don't ask me to name all the varieties... there are too many to remember. But the reason I bring them up is that no matter what kind it is, it propagates the same!  To propagate a succulent, you start by snapping off a leaf. It has to be a clean break from the stem:
Succulents usually grow tall and leggy, it's just what they do and it's not as pretty. When this happens, I snap the leaves off the lower part of the stem and lay them out so they can callous over. It's important to let the leaves callous over where they once were attached to the stem. They won't root properly if you skip this step. Let them "dry" for about a week. I do the same things with the tops:
I just snip the tops off with a pair of scissors or garden snippers and let them callous over as well. Tops are the easiest to regrow. You just stick them in some nice nutrient rich topsoil and water them with a spray bottle 2-3 times per week. Once they are strong enough you can move them outside. That's when they will really take off!  Here's a top that I restarted this week:
This start lost a leaf already. Chances are, if I just leave it alone it will sprout a baby on its own. This is what the babies look like after a few weeks in indirect light, being watered only with a spray bottle:
Aren't they cute!  Notice how the "Mother" leaf is withering. It is best to let it wither and fall off on its own. That way you won't damage the baby when you transfer it and its new little roots to a pot.

After you have stripped off the leaves and decapitated the stem, leave the original stem in its pot and keep on watering it. New babies will grow where the original leaves once were and you'll have a nicely shaped succulent once again!


Spider Plants!

Spider plants are one of my favorite staging plants. They are a beautiful shade of green, they require little to no maintenance other than watering a few times per week, and they look fantastic without any pruning whatsoever. You can put them in pots on the front porch or in the kitchen window (if they're small) and they are SO EASY to propagate!  Spider plants when they mature grow offshoots. These are stem-like growths that come out from among the leaves and attached to the stem are usually several baby spider plants.  I use my snippers to cut the whole baby plus a bit of the stem right off and put them in fertilized water until I see white roots. White roots mean they're ready for the dirt!
Now, I said fertilized water. It can just be tap water, but fertilized water makes the roots come out in just one or two days whereas regular water it can take up to a week or more. My daughter has a planted fish tank that has the BEST WATER oh my goodness, it is FULL of growth enhancing fertilizers so when she changes the tank water once a week I save it and use it to water all my plants! Smart? Mhmm. :D Regular fish tank water is good for plants also, as the nitrate content of the water is very high. I used it for a long time before she got the planted tank. It's like fish water on steroids!
Here is a spider plant I just started (there's a succulent start there, too but the light washed it out):
It was nice and healthy so I moved it outside. I will water it with fish water 2-3 times per week until it needs a bigger pot. Here is one that I put a spider plant and some rose moss together in a small pot:
The rose moss will bloom with small colorful flowers in a few days. Here is what a full grown rose moss looks like (this one is in my garden):
I think it will look good with the spider plant next to it. Now here's a spider plant I started three weeks ago and it has absolutely exploded!  It already needs a bigger pot AND it has offshoots!  I couldn't believe my eyes! (It's that fish tank water, I'm telling you!)

Rose moss also propagates very easily. You can take a stem right off the plant and stick it in dirt, water it and it will grow. Seriously, it's that easy. You'll never have to pay for rose moss again! It makes a nice ground cover, or border, or in a potted arrangement with other plants.

Ok, so I haven't done the math, but I know that one small to medium succulent arrangement costs about $10-$15 depending on your florist. Think of all the plants you could have with a little propagation!  And the spider plants!  I see them at the Home and Garden store and laugh at how many people still buy a cart load of them, when really all you need is one to start with and they will be coming out your ears!

So now you have some tips on how to get plants on the cheap for your house staging projects, or just for use in your own home. I will do another post with more propagating tips because there are a ton of them!  Did you know you can stick a long stem rose in a potato, plant it, and grow a whole new rose bush??  I haven't done it myself yet but I sure am going to try!  I will definitely post about that! If you have other plants that are easily propagated that I haven't mentioned here, leave them for me in the comments and I'll include them in a future post!

Ps. If you stage a lot of houses, more than you can keep up with by planting what you propagate, use nice planters that you can put the plants in, improve your curb appeal and then take the planter with you for another staging. Here is a beautiful plan for a container garden I found at www.bhg.com:

And here is another one you could stage and then take away for your next staging project:
I keep my nice containers on my own front porch when they're not in use at one of my project houses. Sometimes my porch gets quite crowded, but people always say it looks nice! Some days the mail lady can hardly get to the door! lol

If you're going the container route, be sure you still mulch the beds tho, at the very least! Ok, bye for now!

Next: The Painted Door


Wednesday, July 9, 2014

Room Makeovers: A Little TLC is All You Need

Room Makeovers

Sometimes when you have a house to sell, there is that one room... You know the room I'm talking about. Sticks out like a sore thumb?  This is a real shame when the rest of the house is cute because most people want the house to be completely move-in ready when they purchase it.  That one room can ruin a sale.  Take this room for instance:
I mean, oh my goodness. Look how neutral everything else is, and then THAT PAINT! Now is a great time to talk about paint. Ahem.

My paint of choice is Behr Premium Plus, Paint and Primer in one. Yes, it's a little pricier than say, Glidden. A can of Behr will run you about $35.  But when you have a job like this, you are going to need the good stuff.  I can't even imagine a reason to paint a room this color. The rest of the house was cute!

Tips for Sellers: If you are selling your house, paint the walls a neutral color. Even white would be better than bright orange. But there are beautiful shades of grey or taupe that would have looked nice with the carpet in the photo above. You never want potential buyers to be making a mental list of things to change or fix when they are looking at your house. You want them to be imagining their own furniture in your house as if it were theirs already.  NO ORANGE.

My house is not on the market, but I do have some pretty dramatic before and after pics of room makeovers I did on my own.  Here is one of Alex's room we did last year:
The lime green was fun when she was younger, but when she turned 14 she decided she wanted something a little more sophisticated. The color we covered the green with is Behr Grey Squirrel. It is a grey with brown undertones, which goes great with the neutral carpeting in my house. I was quite relieved to get rid of the green. ;)
This is the master bedroom. As you can see, I nearly forgot to take a before pic! But look how much warmer the room gets when we replaced the stark white with a neutral taupe. But buyers can be fickle... some want every room to be white, and I've heard that painting everything white helps a house sell more quickly.  When we bought this house in 2001, every square inch was white. As an artist, I could not WAIT to get some color on the walls!  Ok, one more to show you:
This is our breakfast area. We painted the entire downstairs in Behr Grey Squirrel and one other lighter shade of the same color (can't remember the name). The breakfast area is the lighter grey and I just love it. Same furniture, only the light fixture is different; it was ugly brass before and I spray painted it black:
I used a high temperature spray paint in black which also happened to be matte (surprise!) but I really love how it updated that 1990's brass with a more modern feel to it.  I did the same thing with the light in the formal dining room:
Black spray paint to the rescue!  Now IF I were to show my house (which I'm not- my husband says we are never, ever, ever moving...) then potential buyers would see the black light fixtures and think we paid to update the lighting. Nope, underneath is still the builder's grade brass from 1996 when the house was built. (Shh!  It'll be our little secret!)

I will leave you with this photo. On the left is my sitting room, painted taupe. We decided a few years ago we were tired of the formal cherry wood furniture and jewel tones and completely redid everything in shades of grey.  This one room is the single transformation I'm not all that excited about. Not sure why, but the grey in here looks cold.  What does it need? Side tables? Black and white photos instead of that mirror? Leave your suggestions in my comments, if you have any ideas, and I will post pictures of the changes!

Update 7/30/14 I added end tables and some more pops of that turquoise color on the right hand side. Plus I took the photo with my new wide angle zoom lens, so let's compare!
I also changed out the rug. I like this one much better. Now it feels more balanced in there. I'm still working on the black and white photos to replace that mirror.  Stay tuned!


Next post: Trash to Treasure


Saturday, July 5, 2014

My PhD is in Cleaning

Cleaning Basics

When staging a house for sale, the number one priority is to make sure it is CLEAN.  Especially prone to dirtiness are the sinks, toilets, blinds and around the door handles.  To do a basic but thorough cleaning of these areas, you'll need these:
By no means is this my entire arsenal of cleaners, but with these basics you can pretty much clean the most visible parts of any house. They are: Windex, Clorox Cleanup with Bleach, Clorox Wipes, Wood polish, Febreeze and Microfiber cloths.  I would also add a feather duster, a vacuum and a steam mop but they wouldn't all fit in the picture.  Do you know about Spot Shot?


Spot Shot is the Holy Grail of carpet cleaning!  With Spot Shot and a scrub brush there is no stain or spot that can't be removed I SWEAR BY IT.  You spray it on the spot and can watch it start to dissipate; at that point you step on the spot with a pad of paper towels to soak it out of the carpet fibers, then use your scrubber to scrub the carpet back into shape. I wish all cleaning products were this amazing!  Wait till it dries and then you can vacuum (NEVER vac wet!)

Speaking of rugs: My neighbor had a bulldog with a bladder problem and had hauled this rug out to the curb thinking it was ruined. I said "You throwing that away?" He thought I had lost my mind when I drug it across the street to my back yard. Long story short, I totally rescued this rug AND IT IS BEAUTIFUL!  I would have had to pay a fortune for this new!


Ok, so blinds. Hardest thing to clean, like, ever, especially if they've been dirty for a long time. I take the blinds down (you unhinge the things at the top of the window and they slide right out) and set them in a bathtub of warm soapy water. The grime comes off with a sponge. Yes, you have to wipe down each slat, but you will be glad you did it. Rinse them off, pat dry and rehang. Another way to do it is to put a couple of nails on the top of your fence out back and spray them with a hose. You still have to use the sponge, but some people think it's easier than hauling them to the tub. I will admit, the slats don't move around as much with the hanging technique, but I use the bath tub method for the ones that are extra grimy. They just get cleaner.  If you use the fence technique at a property that isn't yours, be sure to carefully remove the nails when you're done!  :)

Floors

Vacuum: I have a Dyson and I love it.


It's bagless, and it truly never loses suction (unless it's completely and overly full. Don't do this, as it gets hot and is really bad for the motor). It's also very easy to clean the brush head which catches a lot of hair, strings, fibers, etc. You just flip it open and clean it off. I typically do the vacuuming very last if I can. I know it seems crazy but I like to see the lines in freshly vacuumed carpets! LOL! My kids grew up going around rooms that I had just vacuumed so as not to leave footprints in THE LINES.  Besides, you want potential buyers to feel like they are looking at a brand new house and that they are the first to see it. I don't know why this psychology works, but it does. And agents always appreciate it.

Steam Mopping: I can't say enough about my Steam Mop. It is so much better than traditional mop and bucket mopping, you will wonder how you ever lived without it. It cleans hardwoods, tile, laminate flooring, concrete floors, any hard surface floor can be steamed and it uses no cleaner! The steam does the work. My steam mop has three settings, low medium and high. Most of the time I use it on low, and medium in the bathrooms. I have used it on high on some tile in my daughter's rental house that I thought would NEVER come clean, and sure enough, it did! I had to go over it twice (it had once flooded and not ever been cleaned. Can you believe a landlord would leave a floor like that?)  But we left it looking spotless.

Febreeze:  I know the realtors usually like to light a candle before they show a house (some agents bake bread or cookies!) because let's face it, nice smells put us in a positive mood and people in a good mood are likely to feel positively about the house you're showing.  But I leave the candles to the agents. After I have cleaned a property, I give every room a couple of spritzes of Febreeze.  It's fresh, not over powering at all and leaves a nice clean smell in the house, like you've opened a window on a fresh spring day.  Personally, I like the smell of bleach; it means I GOT STUFF CLEAN! But it can be kinda harsh, so Febreeze is my friend.

Clorox Cleanup Spray: great in sinks, on counters, inside showers, toilets, just know that it does have bleach in it so use care not to get it on carpets, curtains, etc.

Clorox Wipes: these contain NO BLEACH and clean grime off of just about every surface, especially around door knobs, window sills, baseboards, banisters (you don't realize just how nasty banisters can get until you clean one)!  I couldn't do without my Clorox wipes. My husband bought a store brand (see photo) but I protested. Clorox Wipes smell nice, they are thick enough and they truly get stuff clean!

A clean house is more likely to get higher offers, plain and simple. A grimy house is going to make potential buyers wonder what else is wrong with it that they can't see.  Never show a dirty house again!  Call me!  :D

Next post: Landscaping


Friday, July 4, 2014

It All Started With a Little Cleaning...

Midwest City: 1809 Sandra Drive

My oldest daughter grew up in Midwest City, Oklahoma, not far from Tinker Air Force Base. The neighborhoods there are former military housing: small, usually one bath but with vintage tiling, hardwood floors, good sized yards but hardly ever updated and very few have any curb appeal at all. It is a house-flipper's DREAM. 

I am dedicating my first blog post to Midwest City, and to the rent house we did so much work on in 2013, inside and out. 
The top photo is how we found the house after an irresponsible renter left it. It was full of trash, full of junk, and full of **POTENTIAL!**  The second photo is after we cleaned and re-staged it. Hard to believe it's even the same room.
Then we tackled the outside. The backyard was a wonderful size, but had been neglected for years. Embedded in the weeds we found all kinds of debris: silverware, bits of plastic, broken glass, old wiring, rusted tools, the list goes on. After disposing of the huge rolls of fence wire, I took a weed eater to the concrete patio to remove years of built up dirt and weeds. After treating the whole thing with round up and trimming the shrub beside it, I staged it with two outdoor chairs and an outdoor table, both of which were free (I am addicted to Freecycle.org. I will do another blog post on Freecycle... if you are not familiar with it, you should be!)  Total cost of this makeover: $0.00!
My youngest daughter agreed to help me create this flower bed. It runs the length of the back of the house. There's a story behind this garden. My oldest, Kelley, was diagnosed at age 19 with ovarian cancer. She was living in this house at the time. For her birthday, I asked all my friends and family to donate one plant to put in Kelley's new garden. Everyone pitched in, and we named it "The Giving Garden."  It was a lot of labor, but labor of love! Alex and I removed the old grass, trash and weeds, laid landscaping fabric, cut timbers for the edges, planted all the donated plants and mulched.  Donated plants included: monkey grass, bougainvillea, rose moss, some succulents, a crepe myrtle, black eye susans, a rosemary bush, another flowering bush, ivy, salvia and three agave plants. Cost for this project: timbers, fabric and mulch, about $50.

Kelley said the hardest part about leaving this house on Sandra Drive was leaving the garden behind. Personally, I loved that house. It had its problems, but with a handful of repairs it could be an awesome investment for a flip. 

Next Blog: Freecycle!